free sweater pattern
Crochet color block cardigan
©2025 Craftedcomfort
This crochet cardigan pattern is perfect for any occasion. It is simple to make and takes little time to complete. The crocheted pattern can be completed in any color or design of your choice. This is a great pattern for beginners and is easy to follow. You can make this color block cardigan with any yarn stash you have at hand to create a simple, but stylish all season cardigan. With the right amount of yarn, you can even make a matching scarf to go with it.
The cardigan is worked by first starting with back panel, then sleeves separate, then front panels as separate pieces too and then join everything together. In case you would want to make your cardigan bigger then add more rows to your ribbing panels and vice versa for smaller crochet cardigan, depending on the cardigan size you want.
All rights reserved. This pattern and its contents are only for personal use. Do not copy, edit, and redistribute/sell this pattern. You are welcome to sell finished projects with your own small photos in small quantities, but if you do so please give pattern credit to HelenCraftCrochet.
Abbreviations and stitches used (USA Crochet terminology, Right hand)
- Slip stitch (slp st)
- Chain (ch)
- Stitch (st)
- Double crochet (dc)
- Slip knot (slp knt)
- Single crochet (sc)
Skill Level: Beginner
Materials:
- Yarn: Approximately a total of 600g, DK, 100% Acrylic yarn/ Cotton yarn for the entire project, size S but you can add more balls of yarn if you are making a bigger cardigan or use less yarn for smaller size and you can use any yarn type/size and colors you have at hand as well as any yarn brand.
- Crochet hook: 3.25mm for ribbing panels and 3.75mm crochet hook for the entire project, (you can use any other crochet hook sizes depending on the yarn type/size you are using as written on the yarn ball’s label for perfect results).
Notions:
- Stitch markers
- Measuring tape
- Scissor
- Yarn needle
Gauge:
- Back panel – 19 inches
- Front panels – 19 inches
- Sleeves – 18.5 inches
Finished Measurements:
- Back panel – 19 inches
- Front panels – 19 inches
- Sleeves – 19 inches
Pattern Notes:
- Use 3.25mm crochet hook for all ribbing panels
- Use 3.75mm crochet hook for the entire cardigan
- Use same yarn types, sizes in terms of thickness for perfect results
- All pieces are worked in continuous rows and separate
- Start crocheting into the second ch for ribbing panel’s foundation ch and first st from the hook at the beginning of every row
- Ribbing panel – Ch and sc into back loops of each st across, except for the last st where you have to sc into both loops
- Ribbing panel – sc only
- Cardigan – Ch and dc sts only
- Always mark your first st (beginning of every row) and last st (end of every row) to keep track of your work
- Always ch 1 before you turn
- Turning ch 1 does not count as a st
- Decrease – crochet the first 2 sts 2 together, on one side only to form a deep v neckline, while keeping the other side straight without decrease
- Keep decreasing front panels until you have 14 sts (decreased part must measure 8 inches long for decreased rows only) for the last row of decrease
- To keep track of your st counts for every row, keep subtracting 1 st at the end of each row before you start a new row.
- Mark the last row of normal dc before decreased (adjusted) row for front panels
- Sleeves adjustments: (increase) Make 2 dc in the first and last st after sc row across the ribbing panel
- Normal dc (without increase) for the next row
- Alternate between increase row and normal row until you have 42 sts
- Keep making normal dc only without any increase until it measures 19 – 19.5 inches long
- Always work in your yarn ends as you go, to avoid having lots of yarn ends hanging
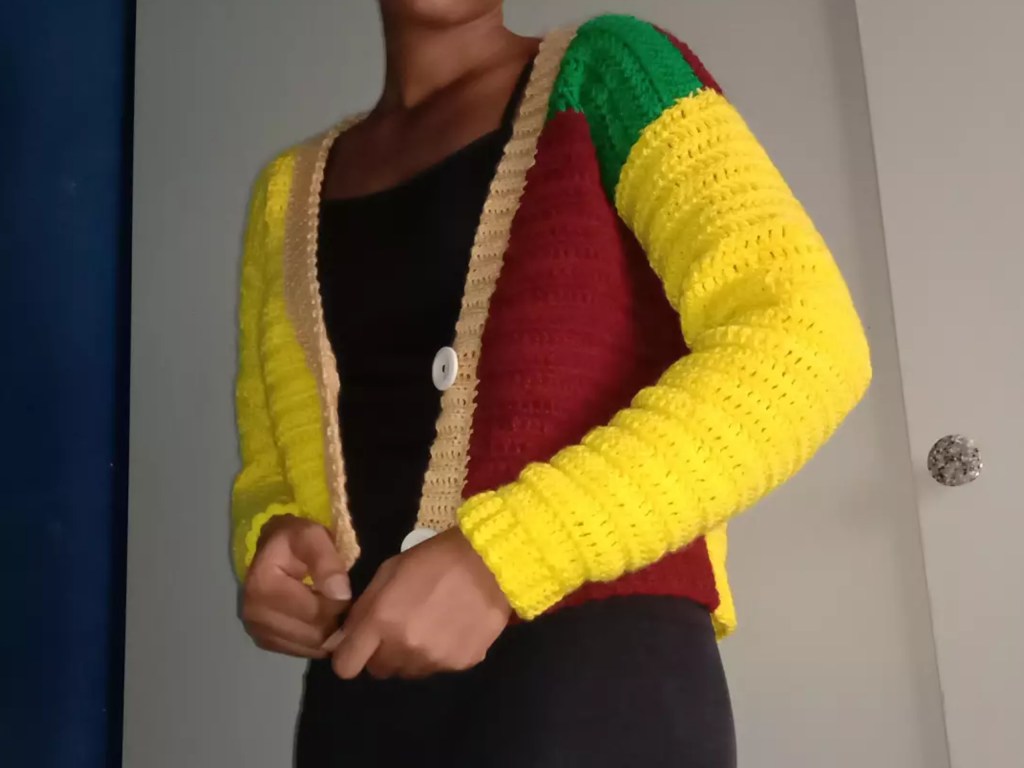
- NB: If you want to make your back panel with two colors like what shown in the picture then make half of the back panel’s size with one color and finish off the other half with a different yarn color or as you desired
- NB: Switching yarn colors (optional)
- Yarn color switching: leave the last dc incomplete with the yarn color you had been using,
- Yarn over, Insert the hook into the last st where the other yarn color have ended, or where you want to start with a different yarn color, pull through the yarn, 3 loops on the hook, yarn over and pull through the first 2 loops, make a slp knt with a different yarn color or just fold it, pull it through those 2 hanging loops on the hook to complete that last dc with a different color, with that different yarn color, as the first row is just the same as previous rows, then the second row you will add straps too.
- You can use as many yarn colors you want or have at hand
- Make sure all pieces are facing the same side (wrong side out) before joining them together
- When joining with either a crochet hook or yarn needle make sure you are grabbing both loops on all pieces you are joining
- Add buttons with the right side out
Pattern
Back panel
- To begin with a ribbing panel,
- Make a slp knt and ch 7
- R1: Sc into the second ch from the hook
- Continue sc in each ch across all the way till the end
- At the end, ch 1, turn
- R2: Sc into the very first st from the hook but only in the back loop
- Continue sc into each st’s back loop until the second last st,
- Sc into both loops for the last st
- Ch 1, turn
- R3-R30: Repeat R2
- You must have a total of 30 rows (60 rows when you count them in a multiple of 2, as each full row contain two small rows)
- Switch crochet hooks
- To start working on the back panel’s body, (crocheting across the ribbing panel)
- Ch 1, turn your work,
- With a 3.75mm crochet hook,
- R1: Sc into the first st from the hook
- Continue sc in each st across the ribbing panel till the end (60 sts)
- At the end, ch 1, turn
- R2: Dc into the first st from the hook
- Continue dc in each st across till end of the row
- Repeat dc row until your project measures about 19 inches long including the ribbing panel
- NB: If you want to make your back panel with two colors like what shown in the picture then make half of the back panel’s size with one color and finish off the other half with a different yarn color
- NB: Switching yarn colors (optional)
- Yarn color switching: leave the last dc incomplete with the yarn color you had been using,
- Yarn over, Insert the hook into the last st where the other yarn color have ended, or where you want to start with a different yarn color, pull through the yarn, 3 loops on the hook, yarn over and pull through the first 2 loops, make a slp knt with a different yarn color or just fold it, pull it through those 2 hanging loops on the hook to complete that last dc with a different color, with that different yarn color.
Sleeves
- Make the same ribbing panel as for the back panel but for sleeves make only about 14 rows
- R1: Sc across the ribbing panel, (28 sts)
- R2: Dc in the first st from the hook
- Continue dc in each st across till end of the row, (28 sts)
- Same procedure you have done for the back panel with dc sts
- R3: Increase
- R4: Normal dc without any adjustments (repeat R2)
- R5: Repeat R3 (increase)
- Keep alternating between normal dc row and increase row until you have 42 sts
- Ones you got 42 sts, dc only without any increase until your sleeves measures 19 – 19.5 inches long including the ribbing panel
- Do the same procedure for both sleeves
Front panels
- Same procedure as for the back panel but the ribbing panel must have the same number of rows as for sleeves (14 rows)
- Ch 1, turn
- R1: Sc in the first st from the hook across the ribbing panel
- Continue sc in each st across the ribbing panel till end if the row (28 sts)
- Ch 1, turn
- R2: Dc in the first st from the hook
- Continue dc in each st across till end of the row
- R3 –R9: Repeat R2
- End of R9 your project must measure 7 inches long including the ribbing panel
- Adjustments: Decrease on one side of the front panel only leaving the other side straight
- Refer to given notes for adjustments
- Keep decreasing on one side only until you have a total of 14 sts which is equivalent to 8 inches long
- Do the same procedure for both front panels
- Do not cut off the yarn, unless you want to switch yarns (to use different yarn color)
Shoulders
- Ch 1, turn
- Normal dc in the first st from the hook
- Continue dc in each st across till end of the row
- Ch 1, turn
- Continue with normal dc sts until you have 9 rows (6 inches) long
- Your front panel must measure 19 inches long, including the ribbing panel
- At the end, ch 1,
- Leave a long yarn tail for joining before you cut off the yarn
Joining (sewing)
- With a yarn needle
- Attach front panels to the back panel
- By staring with shoulders (upper part)
- Insert the yarn needle into both loops on both panels (back panel and front panel)
- After attaching front panels to the back panel, then
- Fold sleeves in halves
- Mark middle sts with a st marker
- Lay down your joined panels with wrong sides facing up
- Attach the marked sts on sleeves to the back panel and front panel’s middle (where they met, shoulder part that you have joined together)
- Sew sleeves to both panel’s upper parts to complete shoulders
- Continue joining all pieces together with yarn needle and yarns
- To complete joining, for sleeves start sewing from cuffs all the way till under arms,
- Continue sewing front panel and back panel’s sides together too including ribbing panels
Front panel’s ribbing
- Make a slp knt
- Insert the hook inside the slp knt
- Then insert the hook in the first st of the hem’s (waistline) ribbing panel
- Ch 1, sc in each st across the front panel all the way up till the neck line on the back panel
- Continue sc in each st down the other front panel all the way till the last st of the ribbing panel
- At the end, ch 1, turn
- Ch 7, sc into the second ch from the hook
- Continue sc in each ch all the way till end of the ch ( 6sts)
- Slp st into the next sc st as well as into the next sc st across the front panel’s side
- Ch 1, turn
- Sc into the first st of the 6 sts you’ve previously made before slp sts, but only into the back loop
- Sc in each st’s back loops across till the second last st
- Sc into both loops of the last st
- Ch 1, turn
- Mark the first row of normal dc on the second front panel from the top
- Or row 9 from the bottom of the second front panel and mark it with a st marker
- Repeat the previous row all the way till up the first front panel, across the back of the neck (back panel)), until you have reached the first row of normal dc on the second front panel (marked st)
- Ones you have reached the marked st,
- Slp st like what you have been doing previously,
- Ch 1, turn,
- Sc into the first st’s back loop only,
- Ch 2, skp 2 sts,
- Sc into the next 2 st’s back loop
- Sc into both loops of the last st
- Ch 1, turn
- Sc into the first st’s back loop from the hook
- Sc into the next st’s back loop
- 2 sc into ch 2 space (button hole)
- Sc into the last st;s back loop
- Slp st into the next 2 sts
- Ch 1, turn
- Take your buttons and try to see if they can fit in that ch 2 space
- Sc into the first st’s back loop from the hook,
- Continue creating the ribbing panel until the last row (first row from the waistline’s ribbing panel)
- Make second button hole, like what you did for the other button hole
- Finish off your ribbing panel by crocheting till end of the waistline’s ribbing panel
- At the end, ch 1 to close
- Cut off the yarn
Attaching buttons
- Lay down your cardigan flat,
- With the right side out (facing you or up)
- Place buttons on the opposite side of the other front panel that does not have button holes
- Each button must be placed opposite the hole on the opposite front panel
- Sew or attach them with a sewing thin metal needle and sewing thread
- Weave in all your ends.
Enjoy, Crochet Made Easy!
This crochet color block cardigan pattern is accompanied by a tutorial video on my YouTube channel for better understanding if the pattern.
Do not hesitate to contact me via email if you encounter a problem regarding this pattern please. If you find this pattern helpful share your finished crochet projects on all of your social media accounts and don’t forget to tag me for credit as I would love to see your finished projects you have made using this pattern. Check out some other similar step by step crochet patterns in my shop and step by step tutorials on my YouTube channel, don’t forget to subscribe for more crochet tutorials.
Email: helenknittingandcrochet@gmail.com
Connect with me on social media
Instagram, Tiktok, Pinterest & YouTube @Craftedcomfort
Twitter@Helencraftcro
Facebook @Helena Mathias/ my page @Helencraftcrochet
©2025 Craftedcomfort

Leave a comment