Crochet top idea

Crochet lace bralette top pattern
©2025 Craftedcomfort
When summer season hits, you want your beach or pool style to stand out. So this crochet bralette top is one of the best crochet project you could ever need to make for beach days. These are my favorite crochet projects I could ever want to work on all the time because they are super quick to whip up and are suitable for the hot weather.
This lace crochet bralette top is so comfortable, light wear, and stylish. You can make it in any bold, and bright colors of your choice. If you’ve ever wanted to crochet summer tops for women/ girls either to give away as gifts or sell at craft fairs before then you will absolutely love this easy crochet bralette top pattern. You can easily whip it up in only few hours. Everything about this crochet trendy bra top pattern is unique, simple and so adorable.
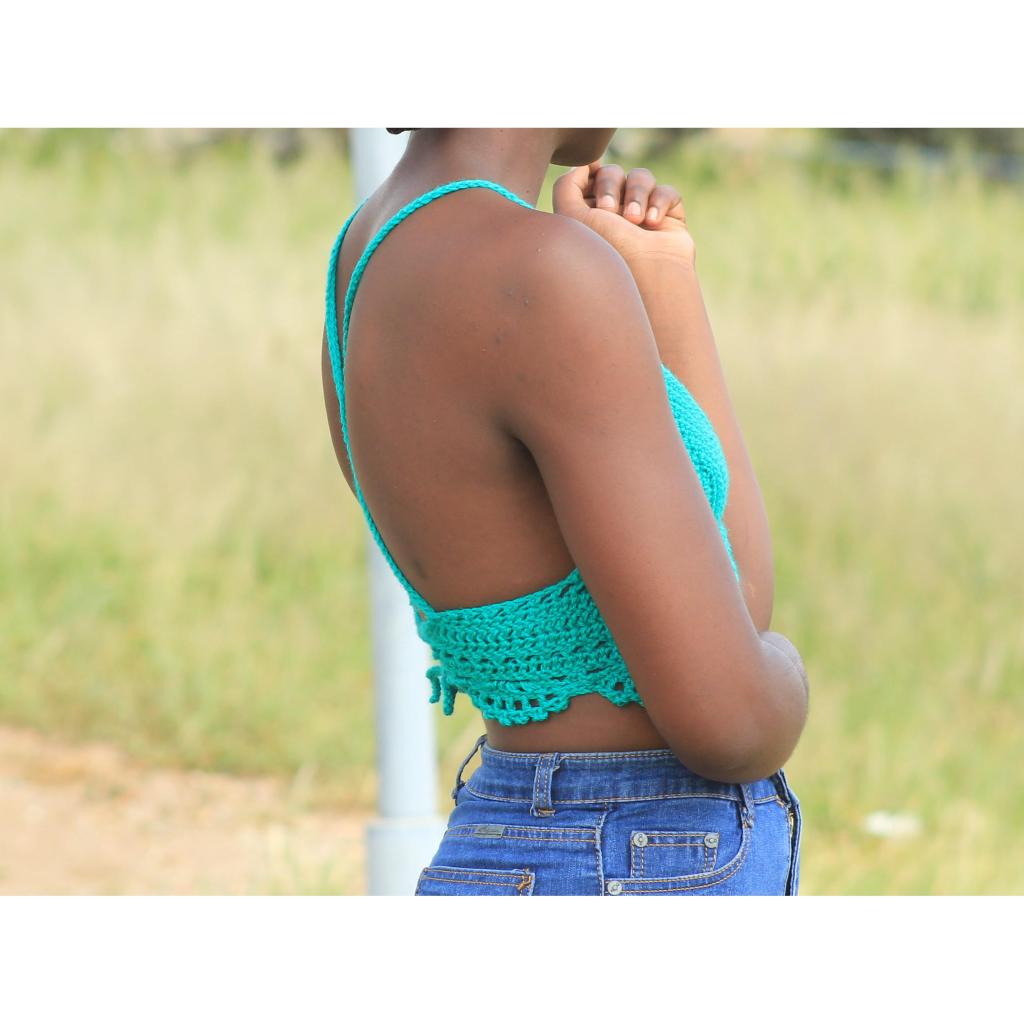
This see through bralette top is worked by making bra cups first separately, join them together, and add 2 long straps that are worked on top of each bra cup’s top for crossing at the back of your neck and tied at your back.
In case you would want to make bigger bra cups then I will suggest you to add more rows before you ch 1 and cut the yarn off for the first bra cup, and before you moved on to the second bra cup, and vice versa for smaller bra cup sizes, by following measurements for different bra sizes in the chart provided, or trying it on yourself or use one of your favorite bra cups for accurate measurements. Straps are made long enough to be tied at the back of a wearer.
All rights reserved. This pattern and its contents are only for personal use. Do not copy, edit, and redistribute/sell this pattern. You are welcome to sell finished products with your own photos in small quantities, but if you do so please give pattern credit to Craftedcomfort97.
Abbreviations and stitches used (USA Crochet terminology, Right hand)
- Slip stitch (slp st)
- Single crochet (sc)
- Chain (ch)
- Stitch (st)
- Double crochet (dc)
- Slip knot (slp knt)
Materials
- Yarn weight: 100g, but this is depending on the size you are making, smaller size you will need less yarn, and bigger sizes you will need more yarn, DK (Double knit)/ or any yarn you have at hand is recommended.
- Yarn materials: 100% Acrylic/cotton yarn
Notions
- Hook size: 3.75mm crochet hook for bra cups and 4mm crochet hook for straps, edging and body, you can use any crochet hook size depending on the yarn type/size you are using as written on the yarn ball’s label)
- Stitch markers: 7 stitch markers/ less
- Scissor
- Measuring tape
Technical notes
- Bra cups- Ch and Sc only, and are worked in continuous rows back and forth until satisfied with desired bra cup sizes
- Straps- Ch and slp st only
- Turning ch 1 does not count as a st and remember to ch 1 always before you turn
- Always mark the first st, top st and last st for bra cups to keep track of your work
- Shoulder and back straps are made as one, long enough to be tied from shoulders to the back
- Picot – ch 3, slp st at the base of ch 3
Tension/ Gauge:
- Bra Cups: 5 inches wide and 5.5 (5½) inches long for size small (8½/4½ rows)
- NB: You can count them in a multiple of 2 to get 4½ or as individuals in each row to get 8½ rows)
Size information & measurements
Sizes: XS, S, M, L & XL
I suggest you choose these sizes based on your bra cup sizes, and the size closest to your actual bra measurements!
- The model in the picture is wearing size Small (32B), same as for measurements used in the pattern, other sizes check for measurements in the chart below.
Crochet Bikini Top Size Chart
| XS | S | M | L | XL | |
| Band/bra size | 32A, 30B | 32B, 32C, 32D, 34A, 34B | 34C. 34D, 36A, 36B, 36C | 36D, 38A, 38B, 38C | 38D, 40D |
| Cup size | A | B | C | D | E |
| Cup Width | 7 In | 7 In | 8 In | 8.5-9 In | In |
NB: Due to manual measurements, please allow +/- 1.5cm error.
- Please compare the measurements with your exact bra sizes before you start crocheting
Finished Measurements:
- Bra cups – 7 inches wide, 7 inches long
- Bust – 32
- Straps- 200 ch per strap
- Space between bra cups: 1.5-2 inches apart
Pattern
Bra cups:
Bra cup 1
- To begin, make a slp knt and ch 15,
- R1: Sc into the second ch from the hook, and continue sc in each ch all the way down the ch till the second last ch,
- Make 3 sc into the last ch, mark the middle sc st of those 3 sc sts with a st marker.
- Make sc into the first st on the opposite side of the ch,
- Sc into every st across till the end, at the end ch 1, turn.
- R2: Sc into the first st from the hook, sc in each st all the way up till the marked st at the top of the bra cup, remove the st marker and make again 3 sc in the same st, mark the middle st and continue sc in each st down the side of the bra cup till the end, at the end ch 1, turn.
- From R3 repeat R2 until the bra cup is big enough as you want it to be (first bra cup must measure 5 inches wide and 5½ (5.5inches) inches long for size S, before you, ch 1 and cut off the yarn and start with the second bra cup.
Bra cup 2
- Repeat the same process as for bra cup 1 until it measures the same as bra cup 1,
- Ch1, turn, add one more same row until you reach the end of the bra cup, do not cut off the yarn.
Cups joining:
- Make sure both cups are facing the same side,
- Lay them down flat with your yarn still attached on bra cup 2,
- Ch 4, insert the hook into the very first st of bra cup 1, and continue sc in each st all the way up, 3 sc into the marked st at the top of the bra cup 1, mark the middle sc st as usual and continue sc down the side of bra cup 1, exactly the same as you did to bra cup 2.
- Ch 1, turn, sc up back again the bra cup until the second last st before the marked st at the top of the bra cup, ch 201, slp st back into the ch by starting with the second ch from the hook and continue slp st in each ch down the ch until you reach the base of the ch.
- Remove a st marker, slp st into that st that was marked, ch 1 to secure your strap, sc into the next st and continue sc in each st down the bra cup all the way until you reach the second last st before the marked st on top of the second bra cup to add another strap the same way you have added the first strap.
- Sc down the bra cup until the end, ch 1 to close, cut off the yarn.
Body:
- Make a slp knt, ch 17, with the right side of your project facing you before you attach the yarn with a slp st into the first st of one of the bra cup’s base.
- Sc into that same st, and continue sc in each st across the base of bra cups including ch 4 in between bra cups all the way till end of the second bra cup.
- Make sure you have same sts under each bra cups, by spacing them well, not too close to each other or too far from each other at least have same number of sts as the total number of rows for each bra cup.
- Ch 18, and make sure your ch is not twisted,
- R1: Dc into the second ch from the hook, ch 1, skp 1 ch, dc into the next ch, ch 1, skp 1 ch, repeat till the second last ch, dc into the last 2 ch, without ch 1 between them, ch 1, turn.
- R2: Dc into the first st from the hook, and continue dc in each st including ch 1 sts across all the way till end of the row, ch 1, turn.
- R3 – R4: Repeat R2 (Dc in each st all the way till the end) at the end, ch 1, turn
- You can repeat R2 as much as you want.
- R5: Sc into the first st from the hook, and continue sc in each st across all the way till end of the row, ch 1, turn.
- R6: Repeat R1 (dc, ch 1, skp 1 st), at the end there is 3 sts, ch 1, skp 1 st, dc into the next 2 sts without ch 1 in between, ch 1, turn.
- R7: Repeat R2 (dc in each st across, including ch 1 spaces till the end), ch 1, turn.
- R8: Repeat R5 (sc in each st across till end of the row), ch 1, turn.
- R9: Sc into the first st from the hook, ch 5, skp 3 sts, sc into the 4th st, ch 5, skp 3 sts, sc into the 4th st (repeat till you reach the last 4 sts, ch 5, sc into the last st at the end of the row), ch 1, turn.
- R10: Sc into the first ch 5 space, 7 dc into the next ch 5 space, sc into the next ch 5 space (repeat till the second last st, dc into the last st at the end of the row), ch 1, turn.
- R11: (Picot row), sc into the first st from the hook, dc into the next st, picot (ch 3, slp st at the base of ch 3).
- Dc into the next st, picot (repeat dc st and picot until you have a total of 5 picots on top of those first 5 sts of the 7 dc sts).
- Dc into the next st without picot, sc into the next st, ch 2, sc into the next st, dc into the next st, picot (repeat till the second last st at the end of the row, dc into the last 2 sts without picots, ch 1 to close, cut off the yarn.
- Weave in all your ends
Hopefully you will find this crochet pattern helpful. With Crochet Patterns, Crochet Made Easy!
Do not hesitate to contact me via email if you encounter a problem regarding this pattern please. This written crochet pattern is accompanied by a step by step tutorial video on my YouTube channel for better understanding of the pattern.
Share your finished crochet projects on all of your social media accounts and don’t forget to tag me for credit as I would love to see your finished projects you have made using this pattern.

Email: info@craftedcomfortinvestmentcc.com
Connect with me on social media
Instagram, Tiktok, Pinterest & Youtube @Craftedcomfort
Twitter@Helencraftcro
Facebook @Helena Mathias/ my page @Helencraftcrochet
©2025 Craftedcomfort

Leave a comment