Crochet free pattern
Crochet cardigan pattern

©2025 Craftedcomfort
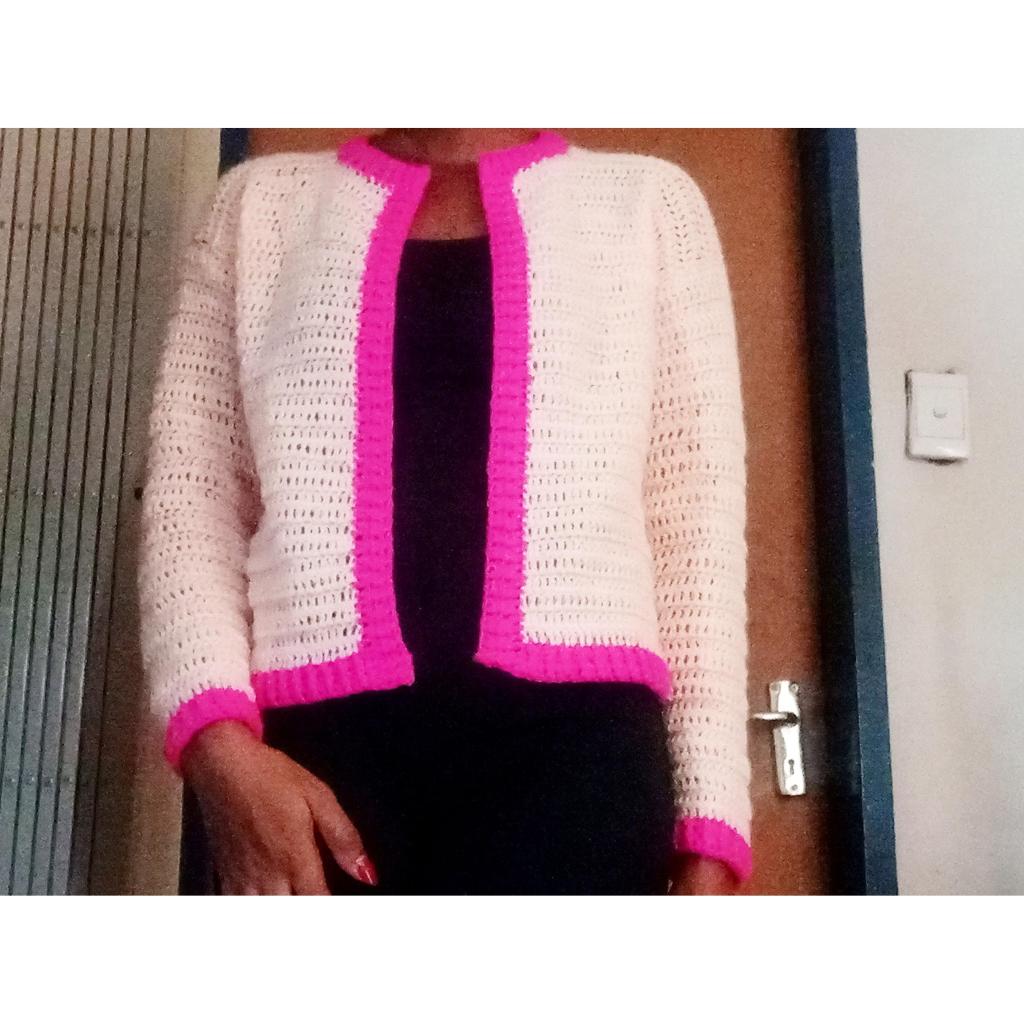
This crochet cardigan pattern is perfect for any occasion. It is simple to make and takes little time to complete. The crocheted pattern can be completed in any color or design of your choice. This is a great pattern for beginners and is easy to follow. You can make this open front cardigan with any yarn type you have at hand to create a simple, but stylish all season cardigan. With the right amount of yarn, you can even make a matching scarf to go with it.
The cardigan is worked by first starting with back panel, then sleeves separate, then front panels as separate pieces too and then join everything together. In case you would want to make your cardigan bigger then add more chains to your edging panels and vice versa for smaller crochet cardigan, depending on the cardigan size you want.
All rights reserved. This pattern and its contents are only for personal use. Do not copy, edit, and redistribute/sell this pattern. You are welcome to sell finished projects with your own photos in small quantities, but if you do so please give pattern credit to Craftedcomfort97.
Abbreviations and stitches used (USA Crochet terminology, Right hand)
- Slip stitch (slp st)
- Chain (ch)
- Stitch (st)
- Double crochet (dc)
- Slip knot (slp knt)
- Half double crochet (sc)
- Front post half double crochet (fp hdc)
- Back post half double crochet (bp hdc)
Skill Level: Advanced beginner
Materials:
- Yarn: Approximately a total of 400g, 4ply, 100% Acrylic yarn/ Cotton yarn for the cardigan’s body, size S but you can add more balls of yarn if you are making a bigger cardigan or use less yarn for smaller size and you can use any yarn type/size and colors you have at hand as well as any yarn brand.
- Crochet hook: 3mm for edging panels and 3.25mm crochet hook for the entire cardigan, (you can use any other crochet hook sizes depending on the yarn type/size you are using as written on the yarn ball’s label for perfect results).
Notions:
- Stitch markers
- Measuring tape
- Scissor
- Yarn needle
Gauge:
- Back panel – 19 inches
- Front panels – 19 inches
- Sleeves – 18.5 inches
Finished Measurements:
- Back panel – 19.5 inches
- Front panels – 19.5 inches
- Sleeves – 19 inches
Pattern Notes:
- Use 3mm crochet hook for all edging panels and 3.25mm crochet hook for the entire cardigan
- Use same yarn types, and sizes in terms of thickness for perfect results
- All pieces are worked in continuous rows and separate
- Start crocheting into the second ch from the hook for all edging panel’s foundation ch and always start working into the first st from the hook at the beginning of every row
- Cardigan – dc sts
- Edges – fp hdc and bp hdc sts
- Always mark your first st (beginning of every row) and last st (end of every row) to keep track of your work
- Always ch 1 before you turn
- Turning ch 1 does not count as a st
- Increase – Make 2 dc in the first and last st starting with the first row across the edging panel
- All edging panels must be done with fp hdc and bp hdc sts
- Always work in your yarn ends as you go, to avoid having lots of yarn ends hanging
- NB: Switching yarn colors
- Always switch yarn colors and crochet hooks after you have completed edging panels
- Yarn color switching: leave the last hdc incomplete (3 loops on the hook) with the yarn color you had been using, fold the new yarn color or make a slp knt and pull it through all 3 loops on the hook to complete the last incomplete hdc st
- To form a neckline, make sure you count from the right hand side for one front panel and from the left hand side for the other front panel, so long as they are both facing the same side
- Make sure all pieces are facing the same side (wrong sides out) before joining them together
- Leave long tails at the end of each piece for joining
- For the back panel, the wrong side must be facing down while for sleeves and front panel’s wrong sides must be facing up when joining
- When joining with either a crochet hook or yarn needle make sure you are grabbing both loops on all pieces you are joining
- Do not pull your yarn too tight when joining
Pattern
Back panel
Edging panel
- To begin, make a slp knt
- Ch 125
- R1: Hdc into the second ch from the hook
- Continue hdc in each ch across all the way till the end
- At the end, ch 1, turn
- R2: Fp hdc into the very first st from the hook
- Bp hdc into the next st
- Alternate between fp hdc and bp hdc till end of the row
- R3: Repeat R2
- Repeat ×3, or as much as you want depending on the edging panel’s size you want
- Ch 1, turn
Back panel’s body
- Switch yarns and crochet hooks (according to the pattern notes)
- Ch 1 with a new yarn color
- R1: Dc into the first st from the hook across the edge panel
- Continue dc in each st across till end of the row
- R2: Repeat R1 until your back panel measures at least 19.5 inches long including the edging panel
Sleeves (make 2)
- Make the same edging panel as for the back panel but for sleeves ch only 35
- Switch yarn colors and crochet hooks, same way you have done for the back panel
- R1: dc into the first st from the hook across the edging panel
- Continue dcin each st all the way till end of the row
- R2: Adjustments – Increase
- R3: Repeat R1
- R4: repeat R2
- R5: Repeat R1
- Keep alternating between normal hdc row and increase row until you have 52 sts
- Ones you got 52 sts, dc only without any increase until your sleeves measures 19 – 19.5 inches long including the edging panel
- Do the same procedure for both sleeves
Front panels (make 2)
First front panel
- Same procedure as for the back panel but the edging panel must have the same number of ch as for sleeves (ch 35)
- Ch 1, turn
- R1: dc in the first st from the hook across the edging panel
- Continue hdc in each st across the edging panel till end if the row (35 sts)
- Ch 1, turn
- R2: dc in the first st from the hook
- Continue dc in each st across till end of the row
- R3: Repeat R2 until your front panel measures about 17 inches long including the edging panel
- Neckline – Adjustments: Count from one end and mark the tenth st for both front panels
- NB: Count from the left for left side front panel and from the right for the right side front panel (make sure both front panels are facing the same side, right side out/up when doing adjustments)
- Adjusted parts must measure 2- 2.5 inches long) and entire front panels must measure 19 -19.5 inches long
Second front panel
- Do the same procedure as for the first front panel
- Follow given adjustments notes as instructed
Joining (sewing)
- Lay down your cardigan flat
- With a yarn needle
- Attach front panels to the back panel
- By staring with shoulders (upper part)
- Insert the yarn needle into both loops on both panels (back panel and front panel)
- After attaching front panels to the back panel,
- Do not pull your yarn way too tight
- Do not skp any st in between
- Join until you have reached the tenth (marked st),
- At the end, tie well your yarn tail or use a crochet hook to slp st into last sts, ch 1 to close before you cut off the yarn
Attaching sleeves
- With their wrong sides out
- Fold sleeves in halves
- Mark middle sts with a st marker
- Lay down your joined panels with wrong sides facing up/out
- Attach the marked sts on sleeves to the back panel and front panel’s middle (where they met, shoulder part that you have joined together)
- Sew sleeves to both panel’s upper parts to complete shoulders
- Continue joining all pieces together with yarn needle and yarns
- To complete joining, for sleeves start sewing from cuffs all the way till under arms,
- Continue sewing front panel and back panel’s sides together too including edging panels
Front panel’s edging
- Make a slp knt
- Insert the hook inside the slp knt
- Then insert the hook in the first st of the last row before neckline’s adjustments
- Slp st to attach the yarn to the front panel
- Ch 1, hdc into that same st you have made a slp st
- Continue making hdc in each st across the front panel all the way up till the last st of the waistline’s edge
- Your sts must not too close or too far from each other, they must be well spaced
- At the end, ch 1, turn
- Fp hdc into the first st from the hook
- Bp hdc into the next st
- Alternate between fp hdc and bp hdc sts till end of the row
- At the end, ch 1, turn
- Repeat fp hdc and bp hdc row as much as you want or only 3×
- Both front panels must be done in the same way
Neckline edging
- Make a slp knt
- Attach the yarn to the project with a slp st into the front panel’s upper edge (where you have started with front panel’s edging
- Hdc into the same st you have made a slp st
- Continue hdc in each st across the neckline till the end
- Your sts must be well spaced, not way too close or too far from each other
- At the end, ch 1, turn
- Repeat the same edging procedure as for other edges
- Ch 1, cut off the yarn
- Weave in your ends
Optional
- Add a zip/ buttons/ a strap for closing your cardigan, in case you don’t want to leave it open without any closure.
- Weave in all your ends.
Enjoy, Crochet Made Easy!
This crochet cardigan pattern is accompanied by a tutorial video on my YouTube channel for better understanding if the pattern.
Do not hesitate to contact me via email if you encounter a problem regarding this pattern, please. Share your finished crochet projects on all of your social media accounts and don’t forget to tag me for credit as I would love to see your finished projects you have made using this pattern. Check out some other similar step by step crochet patterns in my shop and step by step tutorials on my YouTube channel, don’t forget to subscribe for more crochet tutorials.
Email: helenknittingandcrochet@gmail.com..
Connect with me on social media
Instagram, Tiktok, Pinterest & YouTube @Craftedcomfort97
Twitter@Helencraftcro
Facebook @Helena Mathias/ my page @Craftedcomfort97

©2025 Craftedcomfort

Leave a comment