Summer Top
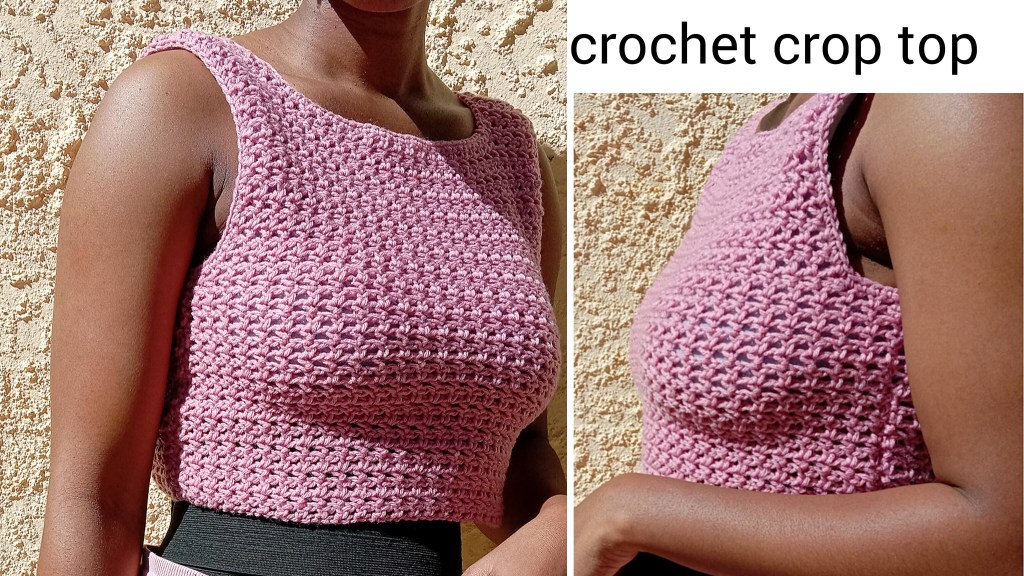
Crochet herringbone mesh top
©2025 craftedcomfort
Simple, stylish and modern herringbone crop top is perfect for summer. This crochet tank top features simple smooth edges which will add stylish feminine to your summer wardrobe and it will be one of your number one to go top of all time as it can also be styled in different ways, either worn alone with your favorite denim jean or shorts, or layered with a long sleeve for early fall days. It is super quick to make.
The top is worked by first starting with crocheting 2 separate panels, then seam them together. It is worked by flat layered the project, and keep turning over throughout. In case you would want to make your crop top in a bigger size then add more chains to your foundation chain as this will be around your waistline and this applies only if you intend to make a normal length top, or if you want to make it a crop top then the foundation chain will be around your ribs and if you want a bralette top then the foundation chain will be around your upper ribs and add more or less chains to your foundation chain before you proceed with your entire project depending on your top’s desired length.
All rights reserved. This pattern and its contents are only for personal use. Do not copy, edit, and redistribute/sell this pattern. You are welcome to sell finished products with your own small photos in small quantities, but if you do so please give pattern credit to Craftedcomfort. Thank you, Crochet Made Easy!
Materials:
Yarn: 150g, DK, 100% Acrylic yarn/ Cotton yarn for the entire project, you can add more balls of yarn if you are making a bigger crop top or use less yarn for smaller size and you can use any yarn type/size you have at hand as well as any yarn brand, it’s made to measure top.
Crochet hook: 4mm crochet hook for the entire project, (you can use any other crochet hook sizes depending on the yarn type/size you are using as written on the yarn ball’s label for perfect results).
Notions:
- Stitch markers
- Measuring tape
- Scissor
- Yarn needle
Gauge:
- 16 HBDC sts BY 14 pattern rows (5*5inches)
Sizing
- This crochet mesh tank top is designed to be perfect fitting with 1-2 inches positive ease.
- It’s made to measure top for perfect fitting using actual bust measurements.
- The length of this tank top is slightly cropped, all sizes measure approximately 18inches for both back and front panel, from waistline/1st row of each panel.
- It measures about 13 inches from 1st row of each panel till neckline, then add 3inches for shoulders.
- Since it’s a made to measure top then I would suggest you to simply add more rows before you start shaping the armholes.
| Sizes | XS | S | M | L | XL | 2XL | 3XL | 4XL | 5XL |
| Bust | 32 | 36 | 40 | 44 | 48 | 52 | 54 | 56 | 70 |
Abbreviations and stitches used (USA Crochet terminology, Right hand)
- Hbdc: herringbone double crochet
- Ch: chain
- Slp knt: slip knot
- Slp st: slip stitch
- Sc: single crochet
Special stitches
- Herringbone Double Crochet Stitch: Yarn over and insert the hook in designated stitch. Yarn over and pull loop through the stitch and through the stitch and through the first loop on hook. Yarn over and pull through one loop. Yarn over and pull through two remaining loops on the hook.
Skill Level: Advanced beginner
Pattern notes
- This crochet tank top is created by making 2 separate equal panels from bottom up to shoulders then seaming them up at the sides, leaving openings for arms and shoulders plus leaving opening for the neck too.
- Pattern follows a 1 row repeat, (hbdc, ch1 row) only from start to finish.
- If you would like to make the panels longer, simply add more rows after row 17 before shaping arm holes for both panels, while following 1 row repeat.
- Leave long yarn tail before you cut off the yarn to start shaping armholes for seaming and leave long yarn tails for seaming shoulders on both sides of the top but only on one of the panel.
- Start crocheting in the 2nd ch from the hook for foundation chains only and start crocheting in the 1st st from the hook at the beginning of every row from row 2
- Used herringbone double crochet stitches
- Its made to measure vest/top
- Its worked in 2 separate pieces
- Requires minimal seaming
- Worked in rows and layed flat
- Always ch1, before you turn at the end of each row
- Turning ch1 does not count as a stitch
- Always start crocheting in the very first stitch from the crochet hook at the beginning of every row
- The pattern is written for size S, but its size inclusive
- To make a smaller top, make less number of chains for the foundation chain and vice versa for the bigger sized vest/top
- Always mark 1st stitches with st markers to keep track of your work at the beginning and end of each row
Pattern
Pannel 1:
Sizes: XS (58), S (60), M (62).L (64), XL (66), 2XL (68), 3XL (70), 4XL (72) and 5XL (74)
- Ch60
- R1: Hbdc into the 2nd ch from the hook and continue hbdc in each ch till end of the ch
- At the end, ch1, turn your work
- R2: Hbdc into the very 1st st from the hook, mark it with a st marker to keep track of your work
- Continue hbdc in each st till end of the row
- R3- R21: Repeat row 2 until your project measures 8inches long ( 21rows including 1st row)
- At the end of R21, ch1 to close and cut off the yarn
- Forming armholes:
- Count 5 sts from ends,
- Mark 5th sts , turn your work
- Make a slp knt/ just fold the yarn & slp st into the 1st marked st from the same side you supposed to start working on as usual after you have turned your work
- Hbdc into that same st, and mark it as your 1st st as usual
- Continue hbdc in each st till end of the row, (next marked st)
- R22: Hbdc into that 1st st from the hook and continue hbdc in each st till end of the row (keep working only within that marked middle part of the project)
- R22-R63: Repeat R22
- At the end of R36, ch1 but do not cut off the yarn
- Neckline: Count 9sts again from both ends
- Mark 9th sts, turn your work
- R36: Hbdc into the 1st st from the hook, and continue hbdc in each st till the 1st marked st (9th st)
- Ch1, turn,
- Repeat R37-R44: Repeat R36
- At the end, ch 1, leave a long yarn tail for seaming before you cut off the yarn
- the same process for the other side of the neckline
- But for the other side please start the in marked st, and continue hbdc to the end
- Both sides must have 8 rows in total (measures 5inches long)
- Repeat the same process for the second panel
Seaming
- Lay your 2 panels on top of one another with the wrong side facing down for the panel that’s under and wrong side facing up for the top panel.
- Making both right sides facing each other for both panels.
- Lining up shoulders and sides to make sure all rows for both panels are all straight up, opposite each other before start seaming using yarn needle.
- Seam 2 shoulders for both panels and 2 sides for both panels together, starting from the bottom, all the way up along the outside edges, stopping when you reached the last row before 1st row for armholes (R1-R17).
- Seam with a yarn needle
- Use left long yarn tails or use some short yarn pieces from the same yarn you used to make the entire project
- Seam shoulders together
- Seam under arm’s parts (crop top’s sides) together
Edgings
- Make a slp knt, or just fold the yarn instead of making a slp knt
- Slp st in any st around the neckline
- Ch1 to secure and to fully attached the yarn to the project
- Sc into that same st, mark it with a st marker
- Continue sc in each st around the neckline, until you reached the marked st
- Slp st on top of the 1st (marked) st to join, ch1 to close & cut off the yarn
- Repeat the same process for armholes, make sure both armholes have the same number of sts for edging
- Do the exact same thing including measurements to panel 2
- Weave in all your ends and enjoy your new crochet tank top for summer.
- Hopefully you will find this crochet pattern helpful. With Crochet Patterns, Crochet Made Easy!
- Do not hesitate to contact me via email if you encounter a problem regarding this pattern please. Please leave a review on my shop if you find this pattern helpful.
Share your finished crochet projects on all of your social media accounts and don’t forget to tag me for credit as I would love to see your finished projects you have made using this pattern.
Email: helenknittingandcrochet@gmail.com
Connect with me on social media
Instagram, Tiktok, Pinterest & Youtube @Craftedcomfort97
Twitter@Craftedcomfort97
Facebook @Helena Mathias/ my page and facebook group @Carftedcomfort
©2025 craftedcomfort!

Leave a comment